Auto SSO using OAuth 2.0
In this document, we'll explain how to setup Automatic Single Sign On using Bridgekeeper (Quintype’s authentication service).
Please refer to https://developers.quintype.com/bridgekeeper/swagger/ for authentication service API specification.
API Flow
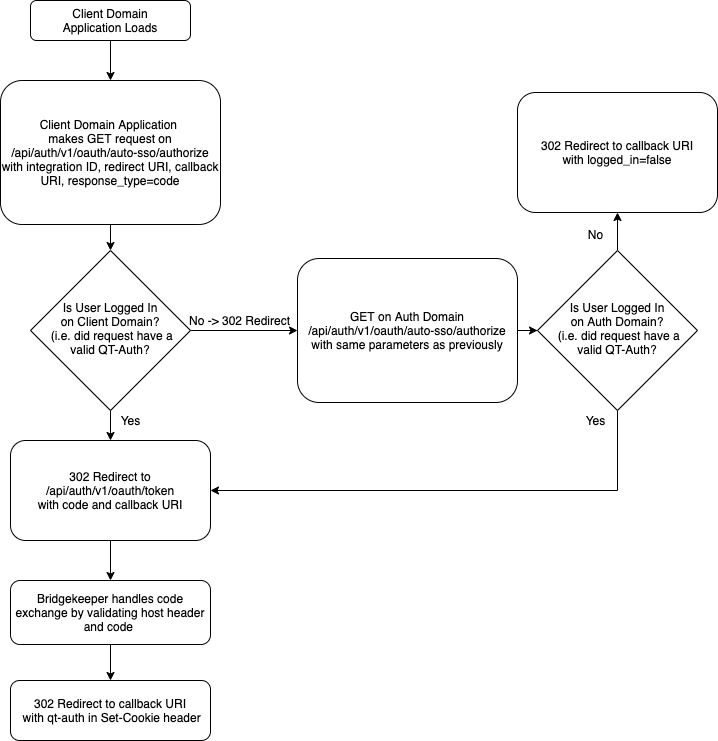
Before beginning the automatic SSO flow, the client application can determine if a user is already logged in on the client domain by making a GET request to Bridgekeeper on /api/auth/v1/users/me, which will return a 200 OK with user details if the user is already logged in, and 401 Unauthorized otherwise.
- If the
/api/auth/v1/users/mecall returns a 401, the client application should make a GET request to Bridgekeeper on/api/auth/v1/oauth/auto-sso/authorize(redirect, not an AJAX request) with query params as follows:
client\_id=INTEGRATION\_ID

redirect\_uri=CONFIGURED\_REDIRECT\_URI

callback\_uri=ORIGINAL\_PAGE\_TO\_REDIRECT\_USER

response\_type=code
N.B. If the client domain uses Bridgekeeper as it’s authentication service (i.e. Bridgekeeper handles user sessions for the domain) all client applications will use the client domain as the host.
If the user is not logged in on the auth domain, this will redirect the user back to the provided callback_uri with a query parameter of
logged\_inas false. The client domain application should check for this value and not make another call to this automatic SSO API.If the user is already logged in on the auth domain, the auth domain will redirect the user to the redirect URL (which will be the redirect_uri parameter in step 1 along with authorization code and callback uri query params). This GET /api/auth/v1/oauth/token route is handled by Bridgekeeper.
Bridgekeeper will convert the authorization code into a qt-auth token and then redirect the user to the callback URI (the callback_uri parameter in step 1) on the client application domain with the qt-auth token set as the session cookie.
Flow

TO view a PDF version of the workflow diagram click this link:
Sample CURL
Authorize (step 1)
curl --request GET 'https://<client-domain>/api/auth/v1/oauth/auto-sso/authorize?client\_id=<integration-id>&response\_type=code&redirect\_uri=<redirect-url>&callback\_uri=<callback-url>'